Image Comparison
ABDiff is designed for image review that combines human inspection with analytical diffing. The goal is not only to prove that two files differ, but to decide whether the difference matters.
Start an Image Comparison
- Drop two images to open image comparison.
- If you drop a new image while already comparing two images, ABDiff keeps the most recent image.
Recommended Workflow
- Align first. Make sure both images share a meaningful comparison grid before you judge the result.
- Start with human inspection. Use Split, Side-by-side, or Crossfade before switching to analytical modes.
- Review at two scales. Start with a fit mode for whole-image context, then switch to Actual Size (1:1) for pixel-level decisions.
- Localize the change. Use Change Boxes to find suspicious regions quickly.
- Classify the difference. Use analytical modes based on the question you are asking.
- Confirm details with the loupe. Verify whether a change is a real regression, expected rendering drift, or harmless noise.
- Export the right view. Once you have the evidence you need, export the current comparison.
Align Before You Compare
Alignment determines how to map images into a shared comparison canvas so corresponding pixels can be compared meaningfully. Alignment can translate or rescale an image, but it never changes zoom, or fit mode.

View modes Side-by-side and Change Boxes place the source images next to each other for display. The other modes overlap them in a shared comparison canvas and use one of four alignment modes:
- Top-Left: place both images at the top-left of the comparison canvas with no scaling or translation. Use this when both images already match in size and position.
- Find Smaller Image in Larger…: locate the smaller image inside the larger one and align it there. Use this when one image is a crop, inset, or appears inside a larger frame.
- Scale Right to Left: uniformly scale the right image to fit within the left image size. Use this when the left image should define the reference grid.
- Scale Left to Right: uniformly scale the left image to fit within the right image size. Use this when the right image should define the reference grid.
When alignment is active, the header shows a badge such as Scaled to Left, Scaled to Right, or Aligned (Containment).
Start With Human Inspection

A review should begin in a visual mode to decide whether a change deserves deeper analysis.
| Mode | Best for |
|---|---|
| Split | Comparing layout, spacing, and local changes across a draggable divider |
| Side-by-side | Inspecting both images at the same time with shared zoom and independent pane panning |
| Crossfade | Revealing subtle visual shifts by blending between left and right |
| Change Boxes | Finding changed regions quickly on the right image |
- Split is the best default when you want to sweep across the frame and compare local areas directly.
- Side-by-side is better when you need both source images visible at once.
- Crossfade is useful when a change is easier to perceive as motion or flicker.
- Change Boxes helps answer “what changed the most in this image?”
Use Analytical Modes To Answer A Specific Question
Analytical modes are strongest after you already know what area or class of change you are investigating.
| Mode | Use it when |
|---|---|
| Absolute Difference | You need the exact per-pixel delta |
| Proportional Difference | Relative change matters more than absolute magnitude |
| Blurred Difference | You want to suppress raster noise and emphasize larger visual drift |
| Edge Difference | You care about contours, spacing, and structure more than color |
| SSIM | You want a structural or perceptual similarity view |
| Delta E | You care about perceptual color fidelity |
- Absolute Difference catches every changed pixel, including antialiasing noise.
- Proportional Difference can make small changes in dark or bright regions easier to see.
- Blurred Difference is useful when exact pixel noise is less important than overall visual change.
- Edge Difference is often the right choice for layout and shape changes.
- SSIM helps judge structural similarity, not exact equality.
- Delta E is the right mode when color accuracy is the question.
Review At Overview And 1:1
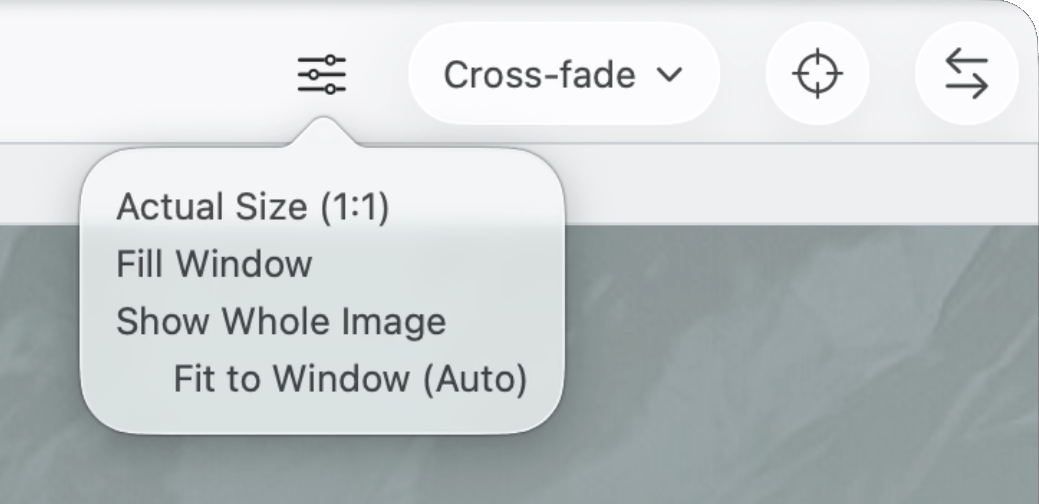
Use fit modes for context, then switch to 1:1 for final judgment.
- Actual Size (1:1): fixed 1:1 pixels. Use this before deciding whether a small change is acceptable.
- Fill Window (Split, Cross-fade, and Difference modes): one-time fit to the current viewport. Can scale above 100%.
- Fill Pane (Side-by-side and Change Boxes modes): one-time shared fit for both panes. Can scale above 100%.
- Show Whole Image: one-time fit that keeps the entire image visible, but never scales above 100%.
- Fit to Window (Auto): persistent auto-fit mode that
recalculates as the window size changes.
- In Split, Crossfade, and Difference modes, it behaves like continuous Fill Window.
- In Side-by-side and Change Boxes, it automatically uses 1:1 when both images fit; otherwise it falls back to whole-image fit.
Use Show Whole Image when you want a one-time, no-upscale overview. Use Fit to Window (Auto) when you want ABDiff to keep adapting as you resize the window.
Zoom with the mouse wheel or the View ▸ Zoom command.
Reposition by dragging the image or using the minimap. The minimap appears only when the current zoom makes the image larger than the viewport. It auto-hides after 2 seconds of inactivity, but stays visible while you hover or drag inside it.
Confirm Suspicious Areas With The Loupe
The loupe lets you zoom the area around the cursor and quickly alternate the content with the opposite image.
Shortcuts
- L toggles the loupe on and off
- A shows left image
- D shows right image
- S cycles magnification: 1× → 2× → 4× → 8× → 1×.
Quick Decision Guide
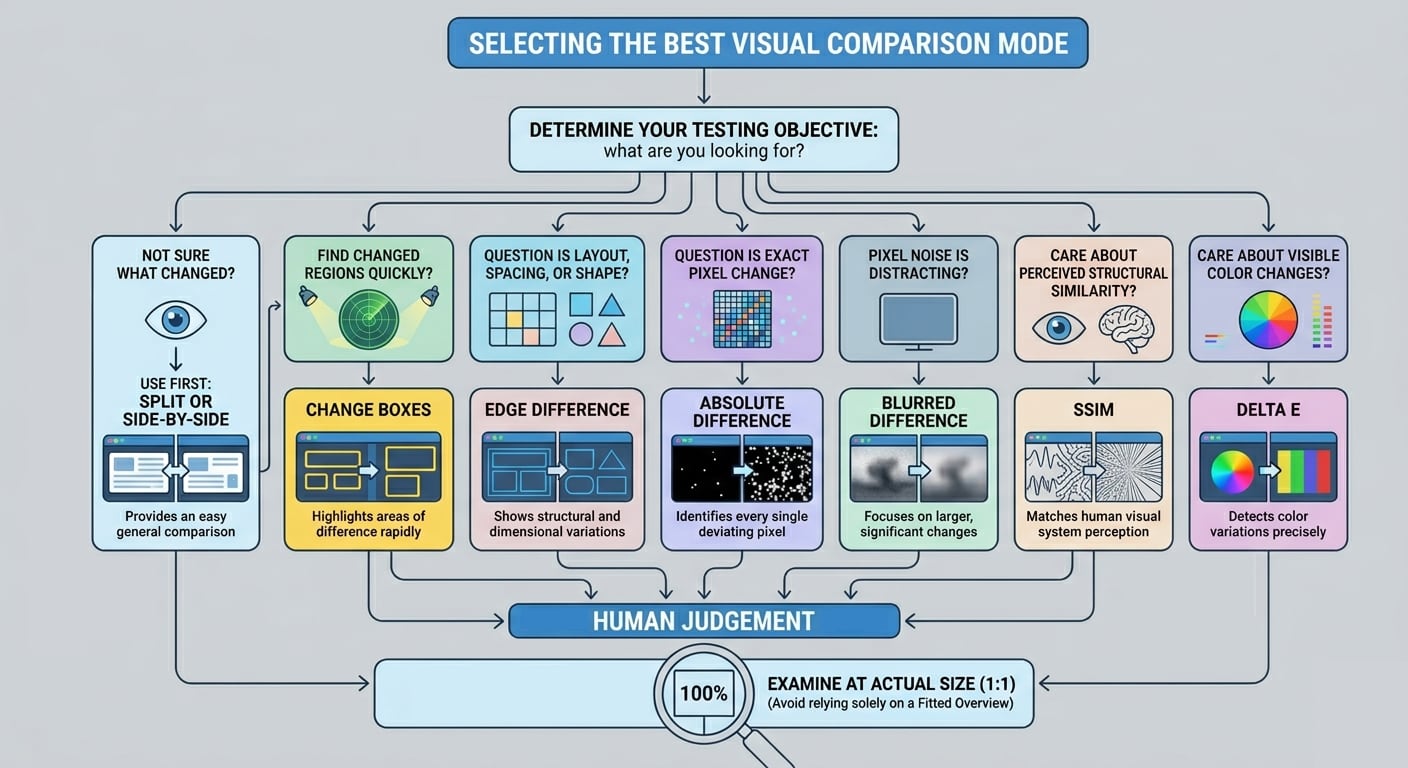
- Use Split or Side-by-side first when you are not yet sure what changed.
- Use Change Boxes when you need to find changed regions quickly.
- Use Edge Difference when the question is layout, spacing, or shape.
- Use Absolute Difference when the question is exact pixel change.
- Use Blurred Difference when exact pixel noise is distracting.
- Use SSIM when you care about perceived structural similarity.
- Use Delta E when you care about visible color changes.
- Make the final call at Actual Size (1:1), not only in a fitted overview.
Export and Revision Review
- Export the current image comparison when you want to save or share the exact view you are using.
- Use the Git history panel to load previous revisions of an image into either pane when reviewing changes over time.